 cogimadeDare to do it your way.
Custom patterns
A frame bag made to fit your bike
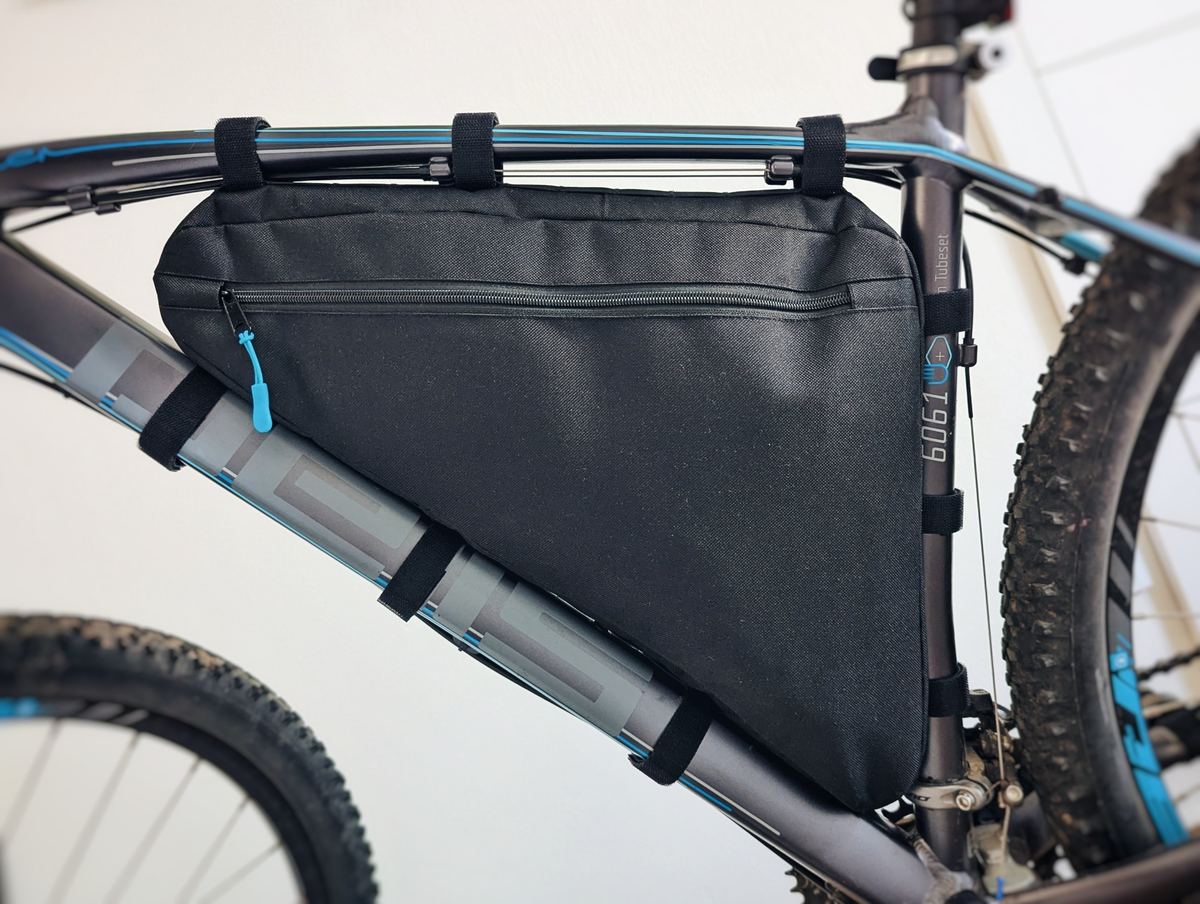
Measure the inside of your frame and the calculator draws a pattern for a bag that fits it: pieces with seam allowances, materials, zip length and volume. The calculator, the drafting plan, the sewing guide and the printable pattern are all free.
How to measure your frame
First work out the shape of your frame window and choose it in the calculator. Then measure from the side, along the inner edges of the tubes.
Measure the orange lines; dashed is the optional check measurement, dotted the imaginary corner under the weld.
- Triangle or quadrilateral: If the top tube and the down tube meet in one point at the head tube, the window is a triangle and three tubes are enough. The bag in the video and photos is sewn for a triangle. If a piece of the head tube is left between the top and down tubes, the window is a quadrilateral: measure that piece too, and the diagonal from corner 3 to corner 2a. If you are not sure, measure it as a quadrilateral; you cannot go wrong.
- Tubes: Top, down and seat tube, plus the piece of head tube for a quadrilateral. The corner numbers are the same as in the calculator.
- The corners are imaginary: A corner is where the inner edges of two tubes would meet if they ran straight on. Welds and rounded corners do not matter, the bag has round corners anyway. It helps to hold anything long and straight against the tube, such as a long ruler, and mark the crossing point with a bit of tape.
- Check measurement: An optional extra measurement, dashed in the drawing: for a triangle from corner 3 to the middle of the top tube, for a quadrilateral from corner 1 to corner 2b. It reveals a measuring mistake; if it is off by more than 3/16 in, the calculator warns you.
- Curved frame: Measure straight between the corners of the window even if the frame is curved. You then refine its real shape with curves from a photo.
Enter your measurements in the calculator, then click Refine curves from a photo: mark the corners on a photo of your bike and create curves that follow the frame. The pattern then fits its exact shape.
Work out your pattern
Enter your frame measurements. The preview, the numbers and the sewing guide below update straight away.
Preview
Bag outline
Seam line without allowances: the finished bag has exactly this shape and size. Cut it out of paper, hold it in the frame and check that the measurements are right and the bag fits. A bag sewn from thicker fabric comes out slightly smaller.
Bag outline in the imaginary frame window.
- outline (seam line)
- imaginary frame window
- frame corner
- zip line, ticks mark the ends of the opening
- point on the seam line (notch)
- direction from point A
Pattern pieces
With seam allowances: cut along the solid line, sew along the dashed one.
Zipped side panel: upper and lower panel and the zipper tabs. The tabs are already drawn at their full double length: cut them as they are and fold them in half.
- cutting line
- seam line
- notch with point letter
- end of zip opening
- fold of zipper tabs
- direction from point A
Inner divider with the pockets and their stitching marked, with the pocket piece above it.
- cutting line
- seam line
- notch with point letter
- pocket fold (opening)
- pocket bottom edge and stitching
- mark for the vertical stitching between pockets
- direction from point A
Gusset: A at the left end, G at the right end; they meet at the joint.
- cutting line
- seam line
- notch with point letter
- direction from point A
| Seam section | Length |
|---|---|
| A–B | 16 5/8 in |
| B–C | 4 in |
| C–D | 13 1/8 in |
| D–E | 2 1/2 in |
| E–F | 10 1/8 in |
| F–G | 3 5/8 in |
| Perimeter (sum of sections) | 50 1/8 in |
| Joint allowance | 2 × 3/8 in |
| Piece length | 50 7/8 in |
| Piece width | 3 1/4 inbag width 2 1/2 in + 2 × 3/8 in |
Zip
The dimensions are named like the form fields in the Zip and zipper tabs group.
Closed zip from the outside. A 5/16 in seam from the tape edge gives a visible zip width of 5/8 in and moves the seam lines of the upper and lower panels 5/16 in away from the zip line; so you can cut the side panel in one piece and then split it along the zip line into the upper and lower panel.
- side panel
- zip tape (fabric part)
- teeth
- panel edge (seam)
- tape edge under the panel
- zip line
- side panel
- zip tape (fabric part)
- teeth
- fold of zipper tabs
- zip under the tab
- seam line
Materials
| Material | Piece | Qty | Takes (rectangle) |
|---|---|---|---|
| Outer fabric | Upper side panel | 2 (mirrored) | 17 1/8 × 2 in |
| Lower side panel | 2 (mirrored) | 17 1/8 × 12 1/8 in | |
| Rear zipper tab | 2 (mirrored) | 4 × 1 1/4 in | |
| Front zipper tab | 2 (mirrored) | 4 × 1 1/2 in | |
| Gusset | 1 | 50 7/8 × 3 1/4 in | |
| Lining | Upper side panel | 2 (mirrored) | 17 1/8 × 2 in |
| Lower side panel | 2 (mirrored) | 17 1/8 × 12 1/8 in | |
| Gusset | 1 | 50 7/8 × 3 1/4 in | |
| Divider | 1 | 17 1/8 × 14 1/8 in | |
| Pockets | 1 | 17 1/8 × 7 1/2 in | |
| Stiffener (no allowance) | Upper side panel | 2 | 16 1/4 × 1 1/4 in |
| Lower side panel | 2 | 16 3/8 × 11 1/2 in | |
| Gusset | 1 | 50 1/8 × 2 1/2 in | |
| Zip | along the zip line | 2 | opening 13 1/8 in, cut to 15 3/8 in |
| Webbing for the loops | all round | 1 | 50 7/8 in |
| Hook-and-loop straps | around the tubes | 9 | double-sided, width to fit the loops; 3 per tube on the bag in the video |
Downloads
The tiled PDF prints on an ordinary printer; tape the pages together using the map on the first page. The SVG is the whole pattern on one sheet for large-format printing. Print both at actual size (100 %) and check the 2 × 2 in square.
The link opens this page with exactly what you see now: measurements, options and curves from the photo.
No printer? You can draft the pattern on paper or cardboard from the numbers below. It takes more work than printing, but it is just as accurate.
The link opens this page with exactly what you see now: measurements, options and curves from the photo.
Input
- Frame (triangle): top 19 1/2 · down 24 3/4 · seat 15 1/8
- Width 2 1/2 · corner radius 1 5/8 · allowance 3/8 · zip on both side panels, line 1 5/8 below the seam, width 1 1/4, teeth 3/16, seam 5/16, tabs 1 5/8, front 7/8 · divider, 3 pockets 3 3/8 deep · all in inches
Frame window
Coordinates in inches from corner 1: x to the right along the top tube, y downwards. The corners are imaginary: where the inner edges of the tubes meet.
| Corner | Where | x | y | Inside angle |
|---|---|---|---|---|
| 1 | seat: top tube and seat tube | 0 | 0 | 90.3° |
| 2 | head: top tube and down tube | 19 1/2 | 0 | 37.7° |
| 3 | bottom bracket: down tube and seat tube | −1/16 | 15 1/8 | 52.0° |
- Draw the top tube: line 1–2, 19 1/2 in long. From corner 1 draw a circle with radius 15 1/8 in (seat tube), from corner 2 a circle of 24 3/4 in (down tube). Where they cross below the line is corner 3.
- Check measurement: corner 3 is 18 in from the middle of the top tube.
Corner rounding (seam line)
The arc touches both tubes at the distance from the corner given in the table and is drawn from a centre at x, y. The distance from the corner to the arc helps when you need to clear something on the frame in that corner.
| Corner | Radius | Centre x | Centre y | Arc starts from corner (along the tube) | Corner → arc | Arc length |
|---|---|---|---|---|---|---|
| 1 | 1 5/8 | 1 5/8 | 1 5/8 | top 1 5/8 · seat 1 5/8 | 11/16 | 2 1/2 |
| 2 | 1 5/8 | 14 3/4 | 1 5/8 | down 4 3/4 · top 4 3/4 | 3 3/8 | 4 |
| 3 | 1 5/8 | 1 1/2 | 11 3/4 | seat 3 3/8 · down 3 3/8 | 2 1/8 | 3 5/8 |
Seam line sections
The seam line in order from point A, as it is sewn to the gusset.
| Section | Kind | Length |
|---|---|---|
| A–B | straight along the down tube | 16 5/8 |
| B–C | arc in corner 2, radius 1 5/8 in | 4 |
| C–D | straight along the top tube | 13 1/8 |
| D–E | arc in corner 1, radius 1 5/8 in | 2 1/2 |
| E–F | straight along the seat tube | 10 1/8 |
| F–G | arc in corner 3, radius 1 5/8 in | 3 5/8 |
Points on the seam line (notches)
The points are where an arc turns into a straight section. A is the gusset joint; G is the same point at its other end.
| Point | x | y | From A along the seam | Where |
|---|---|---|---|---|
| A | 2 1/2 | 13 1/8 | 0 | down tube, 3 3/8 from corner 3 |
| B | 15 3/4 | 2 7/8 | 16 5/8 | down tube, 4 3/4 from corner 2 |
| C | 14 3/4 | 0 | 20 3/4 | top tube, 4 3/4 from corner 2 |
| D | 1 5/8 | 0 | 33 3/4 | top tube, 1 5/8 from corner 1 |
| E | 0 | 1 5/8 | 36 3/8 | seat tube, 1 5/8 from corner 1 |
| F | −1/16 | 11 3/4 | 46 1/2 | seat tube, 3 3/8 from corner 3 |
| G | 2 1/2 | 13 1/8 | 50 1/8 | same point as A, end of the gusset |
Zip
| Where the zip is | on both side panels |
|---|---|
| Zip line | parallel to the top tube, 1 5/8 in below the top edge (top seam line); 16 3/8 in from edge to edge |
| Zip | #5, full width 1 1/4 in, teeth 3/16 in, sewn 5/16 in from the tape edge |
| Visible zip width | 5/8 in: teeth 3/16 in and 3/16 in of tape above and below them |
| Upper panel | seam line at the zip 1 1/4 in below the top edge (5/16 in above the zip line), allowance 5/16 in |
| Lower panel | seam line at the zip 2 in below the top edge (5/16 in below the zip line), allowance 5/16 in |
| Zip opening | x from 1 5/8 to 14 3/4, length 13 1/8 in |
| Zip length | cut to 15 3/8 in: opening + 1 1/8 in under the tab at each end; secure the zip ends with a few zigzag stitches over the teeth so the slider can’t run off |
- If nothing were taken off the side panel, the sewn-in zip would make it taller by its visible width.
- With this zip you can cut the side panel in one piece and then split it along the zip line into the upper and lower panel.
Zipper tabs
The front and rear tabs are equally long, 1 5/8 in from the opening to the panel edge, so the zip looks symmetrical. Each tab is cut at double length and folded in half; the fold is the inner edge at the zip opening. Both layers are sewn to the upper and lower panels at once, like the zip tape (allowance 5/16 in); the outer ends go into the seam to the gusset (allowance 3/8 in).
| Piece | Length (one layer) | Width at edge | Width at fold | Takes (rectangle) |
|---|---|---|---|---|
| Rear zipper tab | 1 5/8 | 5/8 | 5/8 | 4 × 1 1/4 in |
| Front zipper tab | 1 5/8 | 5/8 | 7/8 | 4 × 1 1/2 in |
- The front tab, by the handlebars, where the zip closes and where you can reach it while riding, has room for the slider: at the panel edge it is as wide as the visible zip (5/8 in) and widens to 7/8 in at the fold. The extra fabric forms a hood the closed slider parks under (a zipper garage). On the pattern it is a trapezoid mirrored across the fold.
Layout and pockets
| Compartments | two, each with its own zip: the main compartment on one side, a flat compartment separated by the divider on the other; which side is which doesn’t change the pattern |
|---|---|
| Divider | a lining piece shaped like the side panel, 1×, with 3/8 in allowance all round like the side panel (17 1/8 × 14 1/8 in) |
| Pockets | 3 side by side, 3 3/8 in deep, openings equally wide, numbered from the seat |
| Top and bottom edge | 2 in and 5 3/8 in below the top edge; the top edge (fold) lies at the lower edge of the visible zip |
| Pocket piece | the strip of the side panel between both edges plus a 3/8 in allowance below the bottom edge, at double height, 1×, lining (17 1/8 × 7 1/2 in). Fold it along the top edge: the fold is the pocket opening. The sides go into the seam to the gusset (allowance 3/8 in). The bottom allowance equals the seam allowance, at least 3/16 in. |
| Sewing on | fold the piece in half right sides together and sew the bottom edges with a 3/8 in seam allowance. This makes a tube: turn it right side out, raw edges inside, and flatten it with the fold at the top and the seam at the bottom. Lay it on the divider with the bottom edge on the bottom line and stitch close to the edge. Finally stitch the vertical lines from the table. |
| On the 1 : 1 sheet | the pocket piece is on the sheet as its own piece, at full double height with the fold line across the middle; cut it from flat fabric. The divider shows the fold line, the bottom line and the vertical stitch lines: use them to place and sew on the pockets. |
| Where to sew | onto the divider, inside the flat compartment; the edges and stitching are marked on the divider |
| From x | To x | Opening width | Bottom width | |
|---|---|---|---|---|
| 1 | 0 | 5 3/8 | 5 1/2 | 5 1/2 |
| 2 | 5 3/8 | 10 7/8 | 5 1/2 | 5 1/2 |
| 3 | 10 7/8 | 16 3/8 | 5 1/2 | 1 3/4 |
- x is measured from corner 1 along the top tube, as in the frame window table. The stitching runs vertically, square to the top tube, from the top edge to the bottom edge; at the head tube end it may end on the side of the piece.
Cutting line
- Allowance 3/8 in: move straight sections 3/8 in outwards, draw arcs from the same centres with a radius 3/8 in larger.
- At the zip and the tabs the allowance is 5/16 in (the zip seam from the tape edge). Don’t cut at the fold of the tabs.
- Cut the stiffener without allowance, along the seam line.
- Cut the side panels 2× mirrored: fold the fabric right sides together.
Gusset
Rectangle 50 7/8 in × 3 1/4 in: seam perimeter 50 1/8 in + 2 × 3/8 in for the joint, width 2 1/2 in + 2 × 3/8 in.
| Point | From the left end |
|---|---|
| A | 3/8 · start, joint seam |
| B | 17 |
| C | 21 1/8 |
| D | 34 1/8 |
| E | 36 3/4 |
| F | 46 7/8 |
| G | 50 1/2 · end, joint seam (G = A) |
- Notches go on both long edges. The left end is point A, the right end point G; they meet at the joint.
- The webbing with loops is sewn along the middle of the gusset, over its full length.
Summary
| Bag size | 16 3/8 × 13 3/8 × 2 1/2 in (greatest length × height × width of the finished bag) |
|---|---|
| Volume | 5.7 l (at 2 1/2 in wide) |
Before you cut: the outline in the frame
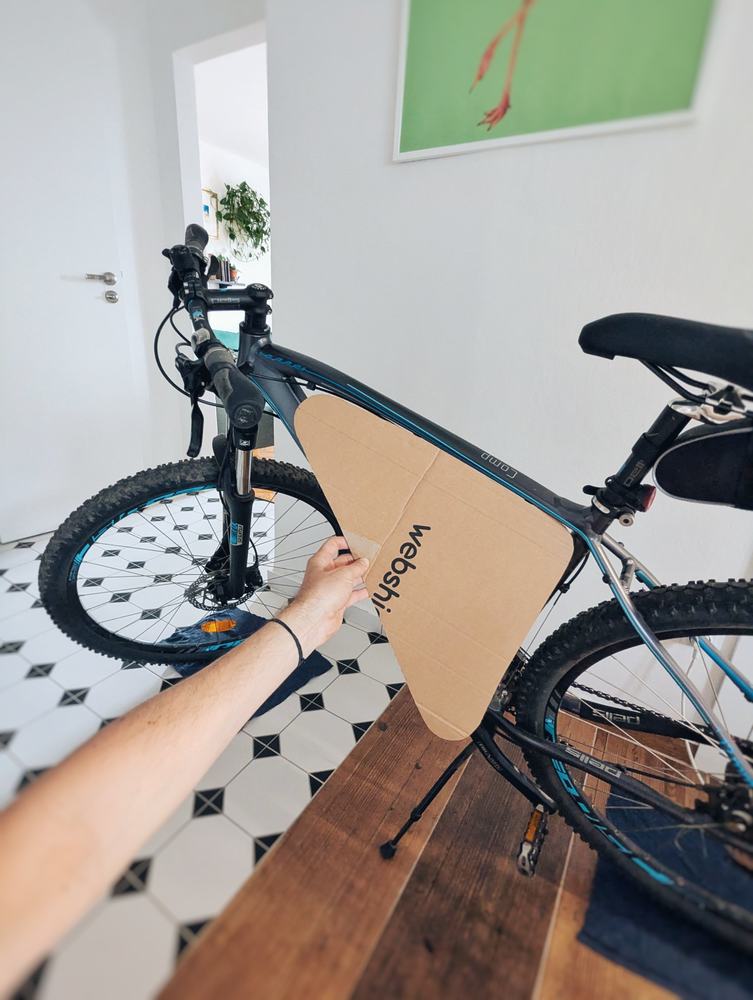
The bag outline has the shape and size of the finished bag. Print it or draft it from the drafting plan, cut it out of paper or cardboard and hold it against the frame from the side. A few millimetres of gap between the outline and the tubes is fine: the hook-and-loop straps that fix the bag to the frame pull it in. If the outline overlaps a tube, measure the tubes again. If a corner runs into a weld, a cable or the front derailleur, make the radius of that corner bigger in the calculator: a larger curve does not reach as far into the corner. Only then cut the fabric.
Materials and tools
The calculator works out what you need and how much. Everything is summed up in the Materials table below the pattern preview.
- Outer fabric: strong, ideally with a waterproof coating on the back. The bag in the video is PVC-coated polyester, sold in Czechia as pram fabric. MYOG guides mostly use Cordura or X-Pac.
- Lining: a light fabric; the inner divider and the pockets are made of it too.
- Stiffener: gives the side panels their shape. In the bag in the video I used an easy-to-find floor cloth: just stiff enough, but it soaks up water and holds it in the rain. Better is a stiffener that does not take up water; MYOG guides use XLPE foam (cross-linked polyethylene) or corrugated polypropylene board (coroplast). I have not tried it yet.
- Zip: from a continuous roll, two pieces in the size chosen in the calculator, each cut to 15 3/8 in, with a slider.
- Webbing: is sewn along the middle of the gusset; stitching across it at regular intervals makes loops for the hook-and-loop straps. Length 50 7/8 in. The width is up to you; the bag in the video has 3/4 in polypropylene webbing.
- Hook-and-loop straps: double-sided, 9 pieces, to fix the bag to the frame. Their width has to suit the loops so the straps slide through easily: the bag in the video has 3/4 in straps in 1 1/8 in loops. A length of 3 3/8 in was enough for the tubes of my frame; add more for thicker tubes.
- Thread: strong, ideally polyester.
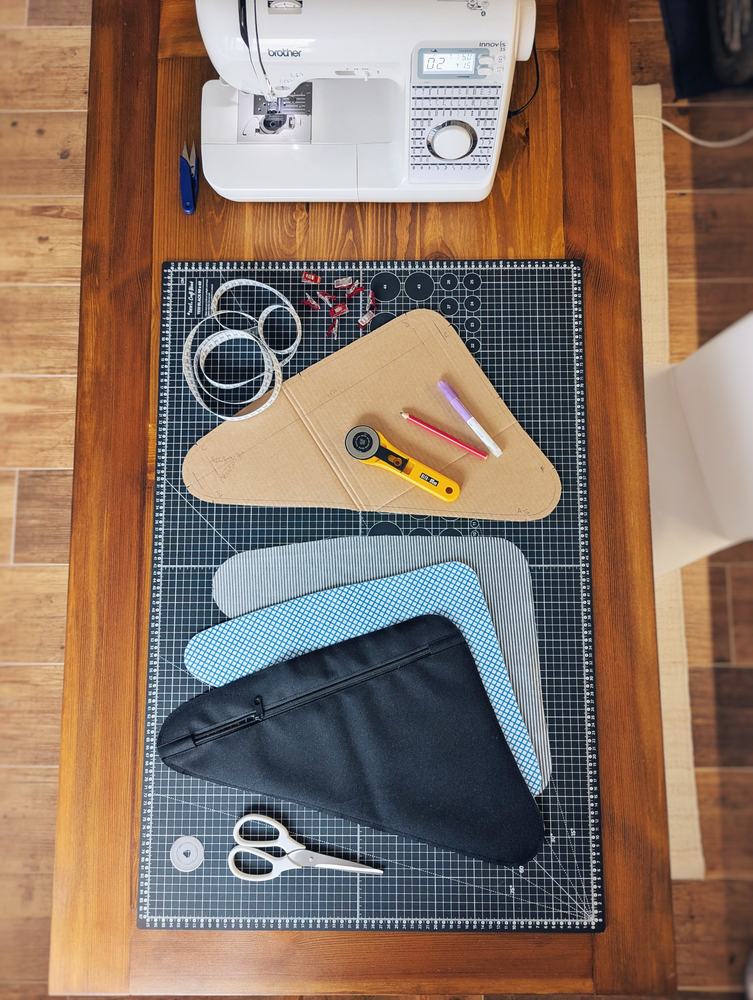
- Tools: a sewing machine with a zipper foot and a heavier needle to suit the fabric (a denim needle, size 90 to 100 / 14 to 16), clips (pins leave holes in PVC-coated fabric), scissors, chalk or a fabric marker, paper for templates.
Sewing guide
The pieces and measurements in the guide come from your pattern and the values entered in the calculator above. Sew right sides together along the dashed seam line, cut along the solid line.
The guide assumes you have sewn a project or two and know your way around a sewing machine. If you get stuck somewhere, email me at info@cogi.cz and I'll fill in the unclear part.
Step 1
Cut the pieces
- Cut the pieces from the paper templates. How many of each is in the Materials table. The side panels are cut as a mirrored pair: once with the template face up, once flipped.
- Outer fabric: upper and lower side panels, front and rear zipper tabs, gusset.
- Lining: pieces of the same shape as the side panels and the gusset. Inner divider. Pocket piece.
- Stiffener: the same shape as the side panel pieces and the gusset, only without the seam allowance: its outline is the dashed seam line on the template. That way it stays out of the seams and you sew through fewer layers.
- Transfer the marks A, B, C, D, E, F and G to the edges of the pieces as notches, short snips no deeper than half the allowance. They line the pieces up when you sew them together.
Step 2
Zip and tabs
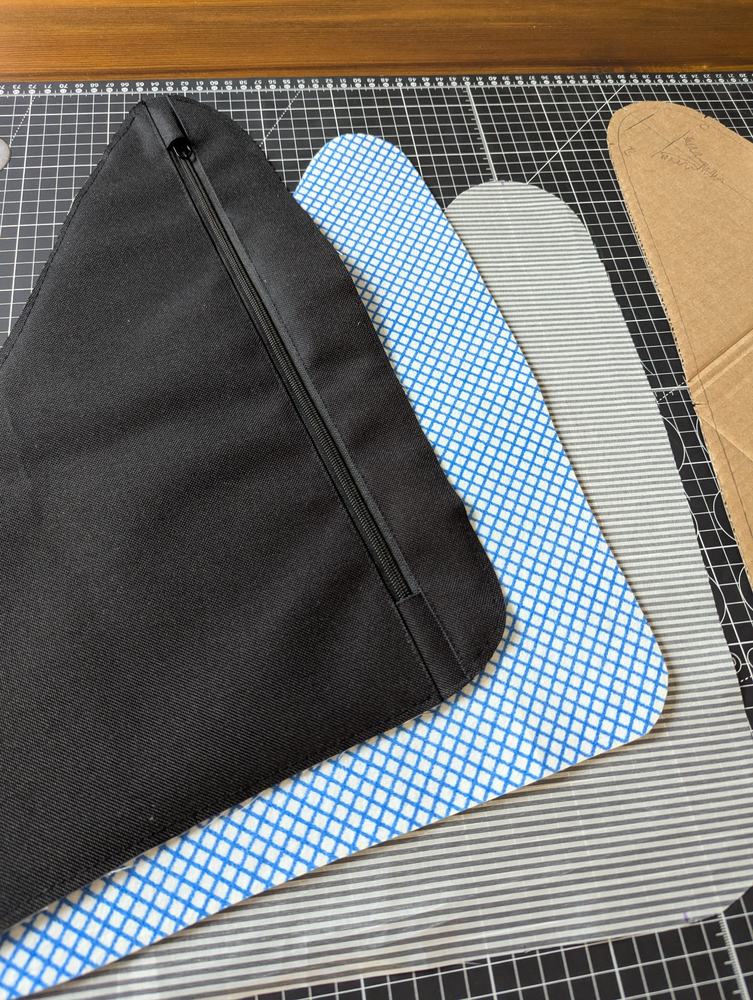
- Cut the zip to 15 3/8 in and put the slider on. Secure both ends with a few zigzag stitches across the teeth right at the end, with the feed dogs dropped so the fabric stays put; the slider then cannot come off. Without zigzag, a straight stitch across, back and forth a few times, does the job.
- Fold the tabs in half; the fold is the edge at the zip opening. Stitch close to the fold. The front tab (on the handlebar end of the bag, where the zip closes) is wider at the fold and makes a little arch for the closed slider to hide under.
- At both ends lay a tab over the zip so that the zip runs 1 1/8 in under it. The zip with its tabs is now a strip as long as the zip line on the side panel.
Step 3
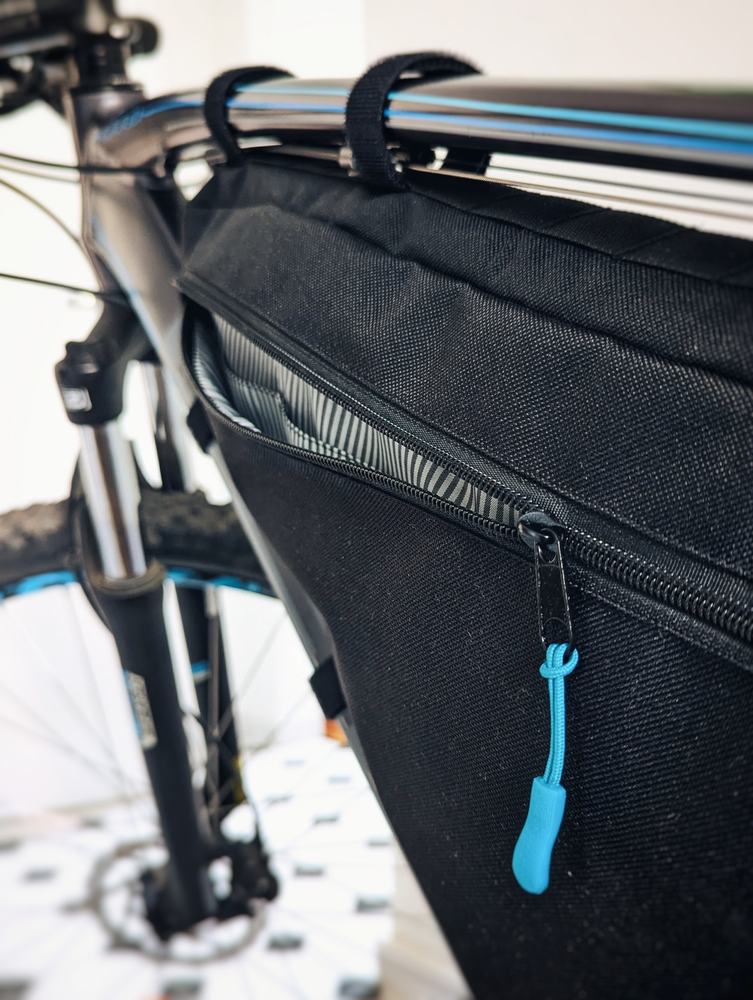
Sew the zip into the side panel
- Lay the upper side panel of outer fabric right side down on the right side of the prepared zip with tabs, edge to edge with the zip tape. From below, place the upper lining panel right side against the back of the zip, so the zip sits between the two layers like a sandwich. Stitch 5/16 in from the edge.
- Sew the lower panel of outer fabric and lining to the lower edge of the zip the same way.
- Fold the pieces back: the zip shows 5/8 in wide between them. From the right side, topstitch close to the edge of both pieces along the zip opening so the fabric does not pull away from the zip.
- Do the other side panel the same way, mirrored.
Step 4
Pockets
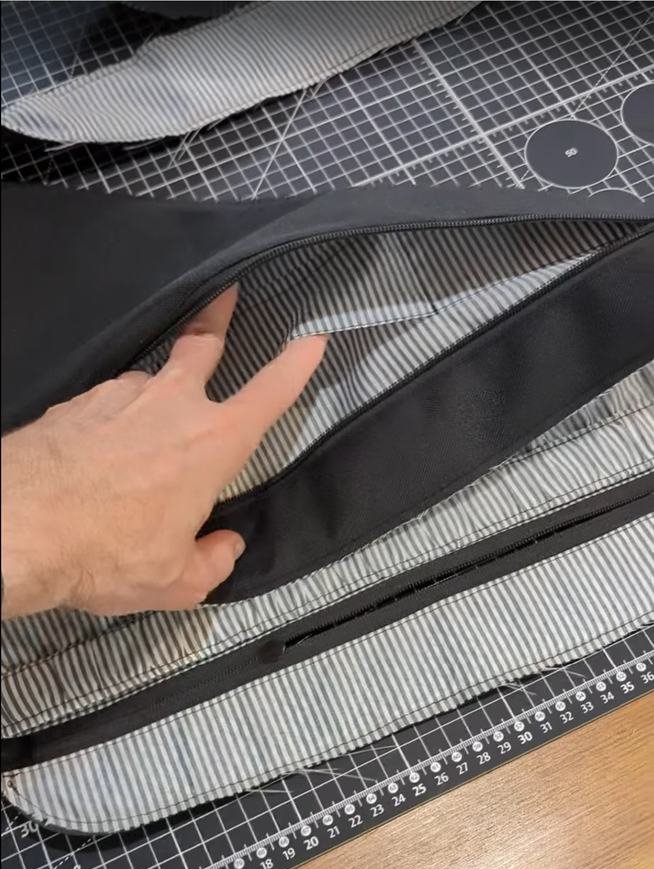
- Fold the pocket piece in half right sides together and sew the bottom edges with a 3/8 in allowance. Turn the tube right side out and flatten it: a clean fold at the top, the seam at the bottom. Stitch the top edge just below the fold so it keeps its shape.
- Lay it on the inner divider with its bottom edge on the marked bottom line, stitch close to the edge and stitch the vertical lines between the pockets.
Step 5
Put the side panel layers together
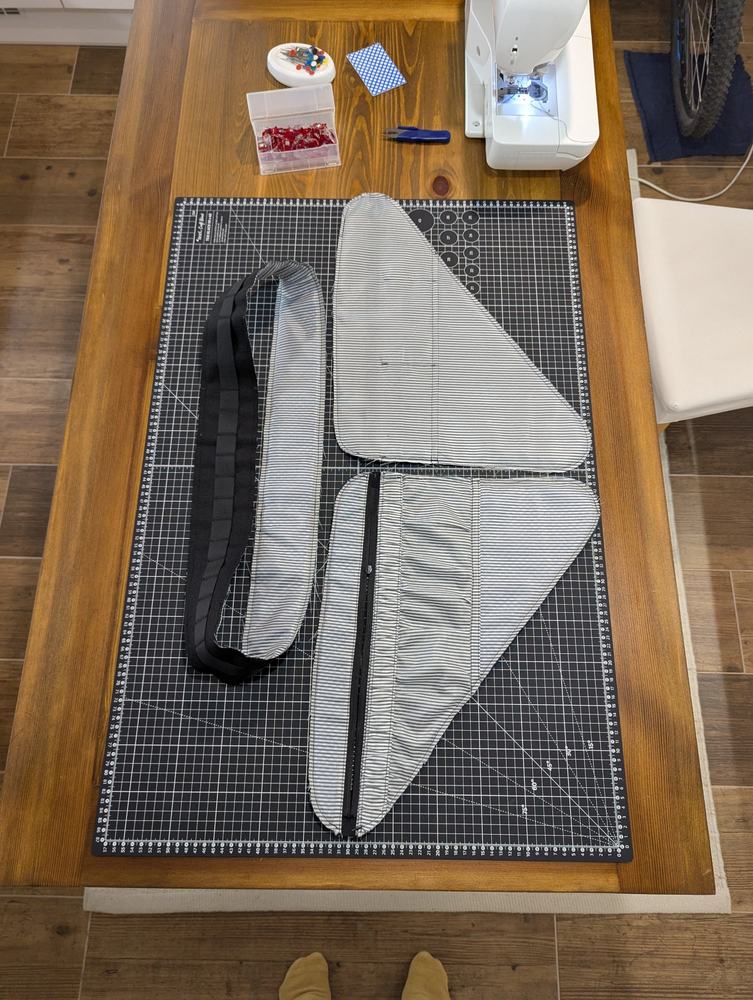
- Place the stiffener between the outer fabric and the lining so that it lies inside and does not reach into the seam line around the edge.
- Before you start sewing pieces together, baste the lining to the outer fabric around the edge, within the seam allowance. The layers then stay put, behave like one piece and the rest of the sewing is easier.
- Lay the inner divider on the lining of the side panel that will have the flat compartment, pockets facing the lining, and baste it to the side panel around the edge, again within the allowance. It then goes into the seam with the gusset together with the side panel.
Step 6
Gusset and loops
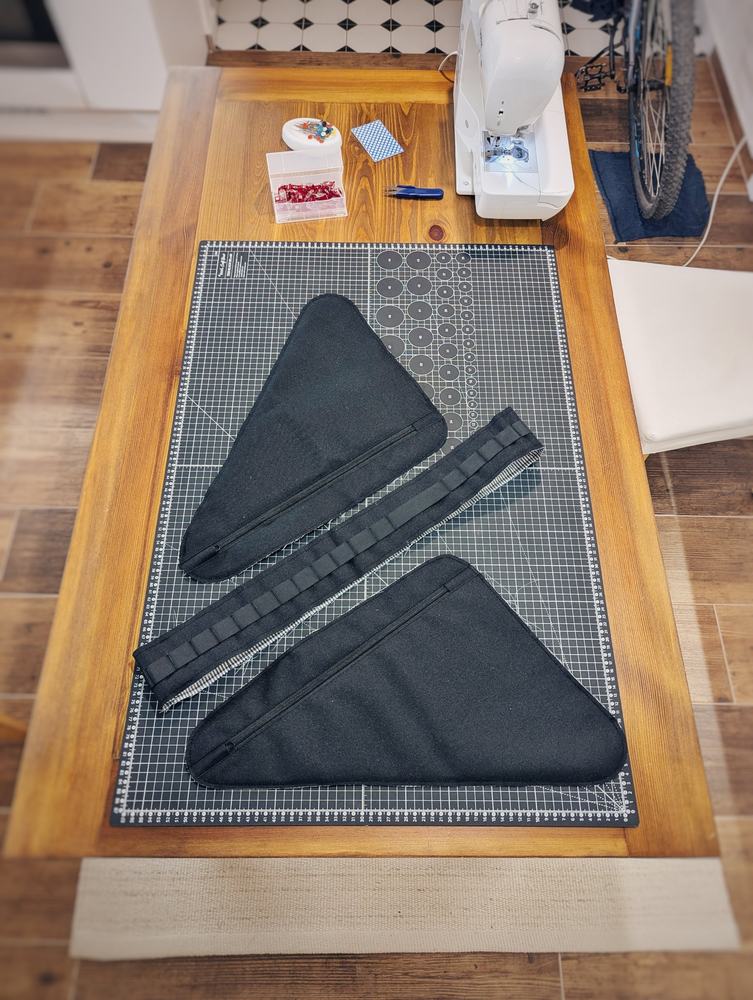
- Sew the webbing along the middle of the outer fabric of the gusset, over its whole length. Stitch across it with a dense zigzag; the stitched spaces between become loops for the hook-and-loop straps. The spacing depends on the width of the straps, which have to fit through the loops: on the bag in the video every 1 1/8 in for 3/4 in straps. Without zigzag, a straight stitch back and forth a few times works. The stitching has to be strong, the loops hold the bag in the frame.
- Place the stiffener between the outer fabric and the lining of the gusset, again so that it stays out of the allowances, and baste the layers together around the edge within the allowance.
- If you want loops inside for strapping things down, sew them onto the lining now, before the gusset seam is closed.
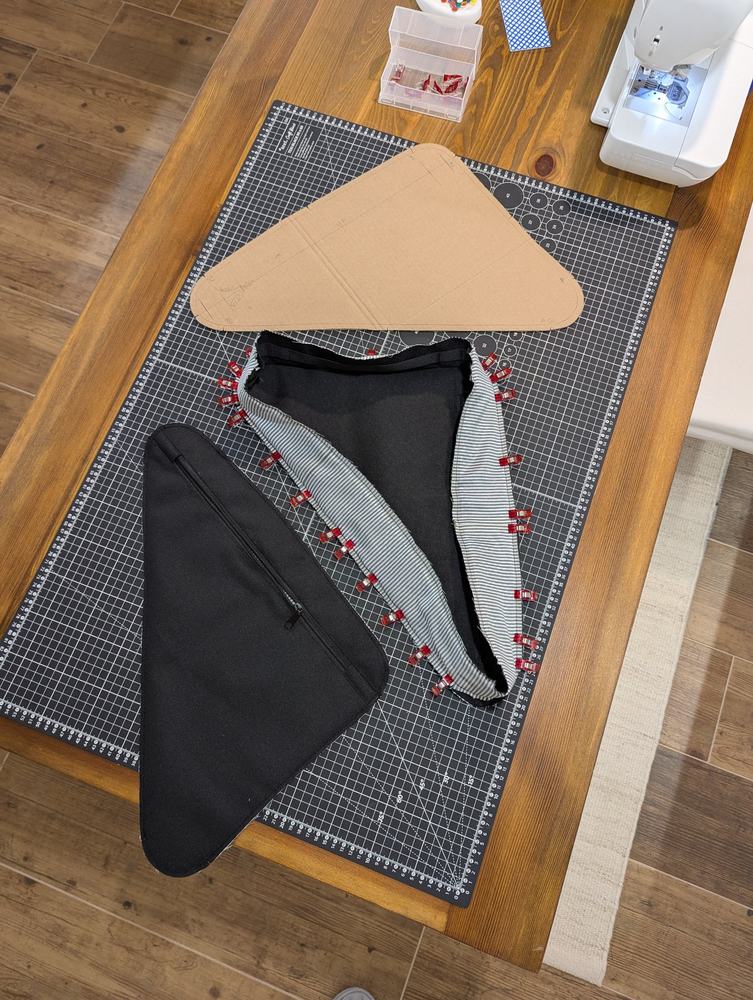
- Clip the gusset temporarily around the edge of the side panel; the marks (capital letters) must line up. Check that the ends meet at point A. Then undo the clips and sew the ends of the gusset into a ring with a 3/8 in allowance.
Step 7
First side panel
- Lay the gusset, sewn into a ring, right sides together on the side panel, mark to mark, and clip it. On the curves, snip into the gusset allowance, not all the way to the seam, so it bends around the curve.
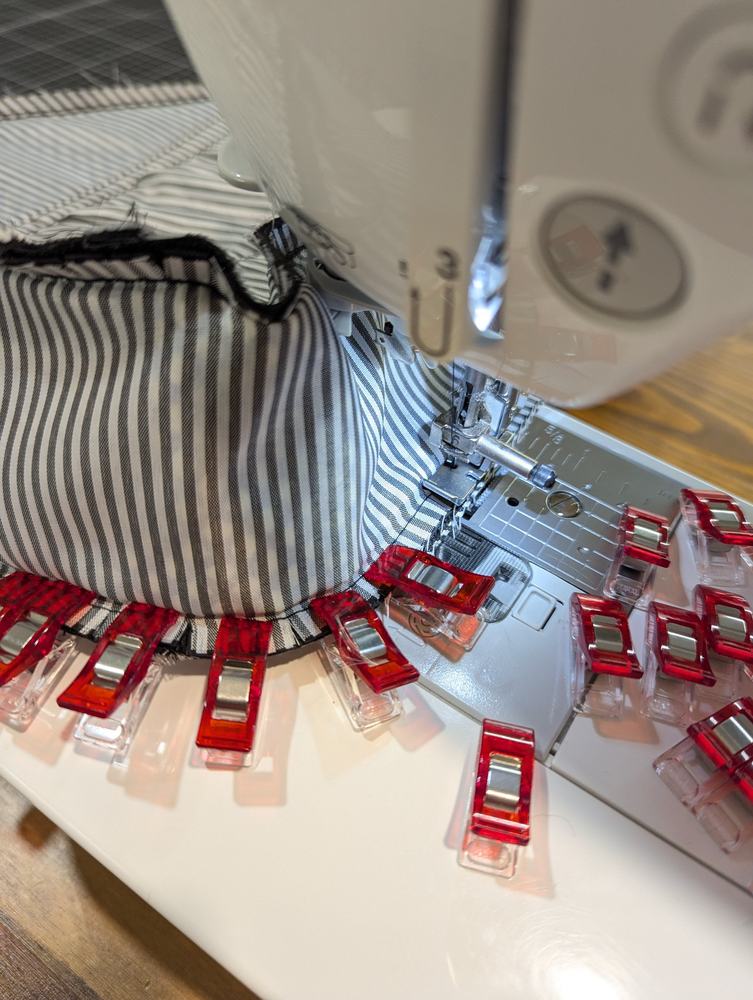
- Sew along the seam line, 3/8 in from the edge. A zipper foot helps: when the allowance is as wide as the foot, the needle runs right along its edge and the curves are easier to steer.
Step 8
Second side panel
- Open the zip, otherwise you will not be able to turn the bag right side out at the end.
- Sew on the second side panel like the first, mark to mark, with the curves snipped. This is the hardest step: the gusset stands upright and the whole bag turns under the foot. Sew slowly and take the curves bit by bit.
Step 9
Finish and turn
- Zigzag the allowances so they do not fray, or finish them with binding tape.
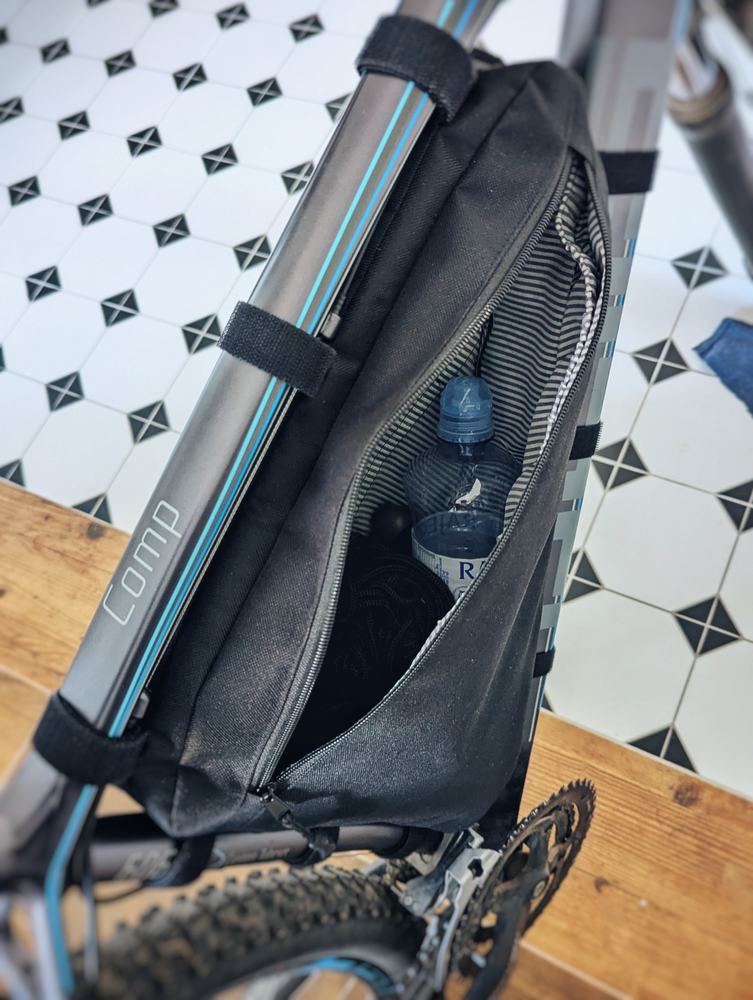
- Turn the bag right side out through the open zip and shape the corners.
Step 10
On the bike
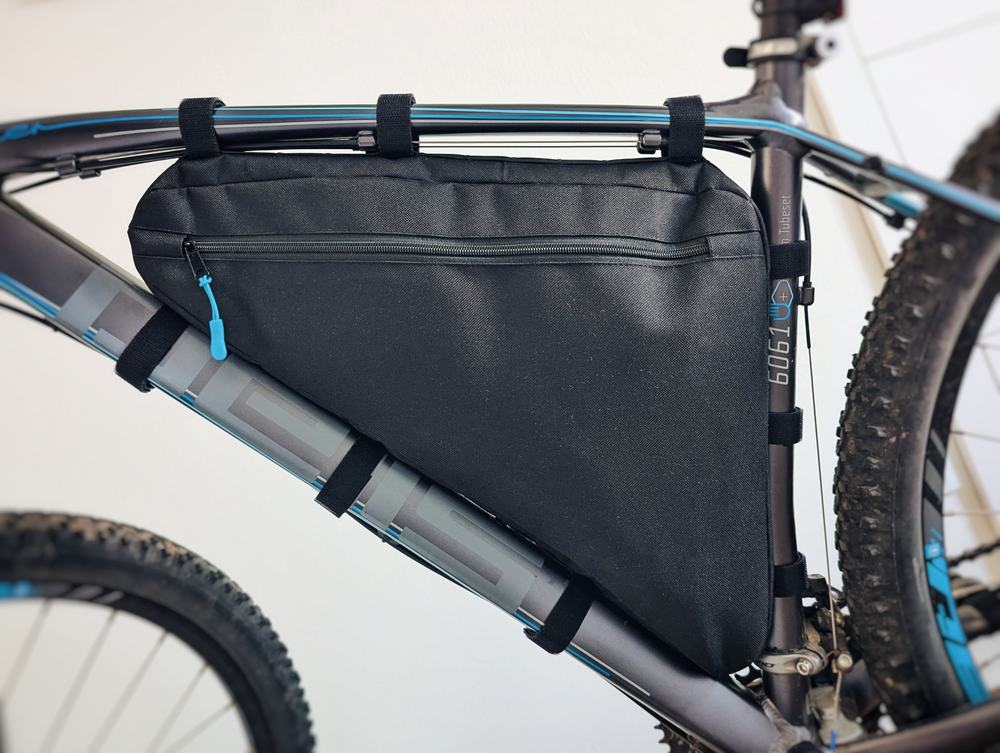
- Thread the hook-and-loop straps through the loops, wrap them around the tube and close them. The bag in the video has three on each tube.
- Put heavy things at the bottom, where they rest on the tubes: they stay in place there even without loops inside.
- The bag in the video is not waterproof: in heavy rain water gets in through the zip and the needle holes. A water-resistant zip helps, as does a fabric flap sewn over the zip or seams treated against water.
Bags made with this pattern
Have you sewn a bag with this calculator? Tag @cogimade on Instagram or send a photo to info@cogi.cz, and let me know whether I may show it here with your name.
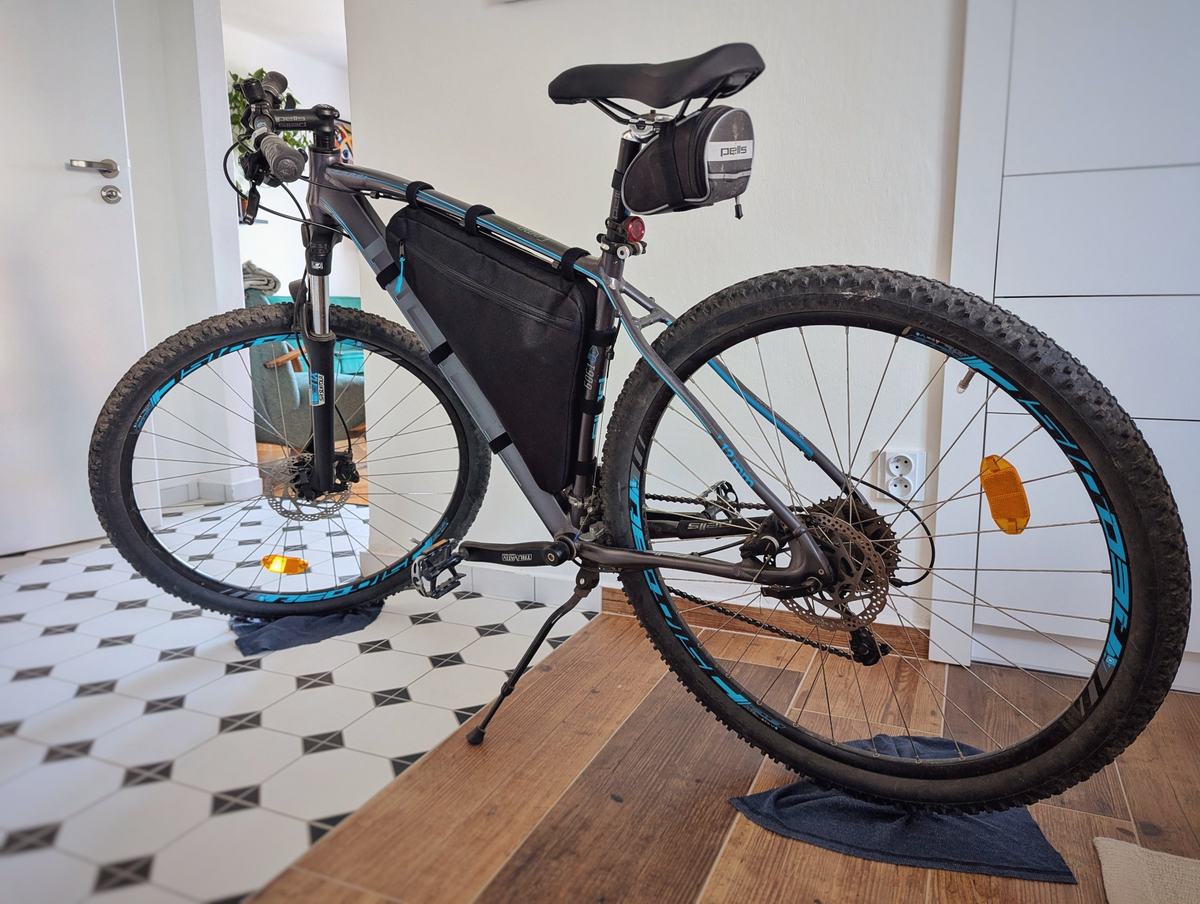
So far there is only mine. Will you be first?